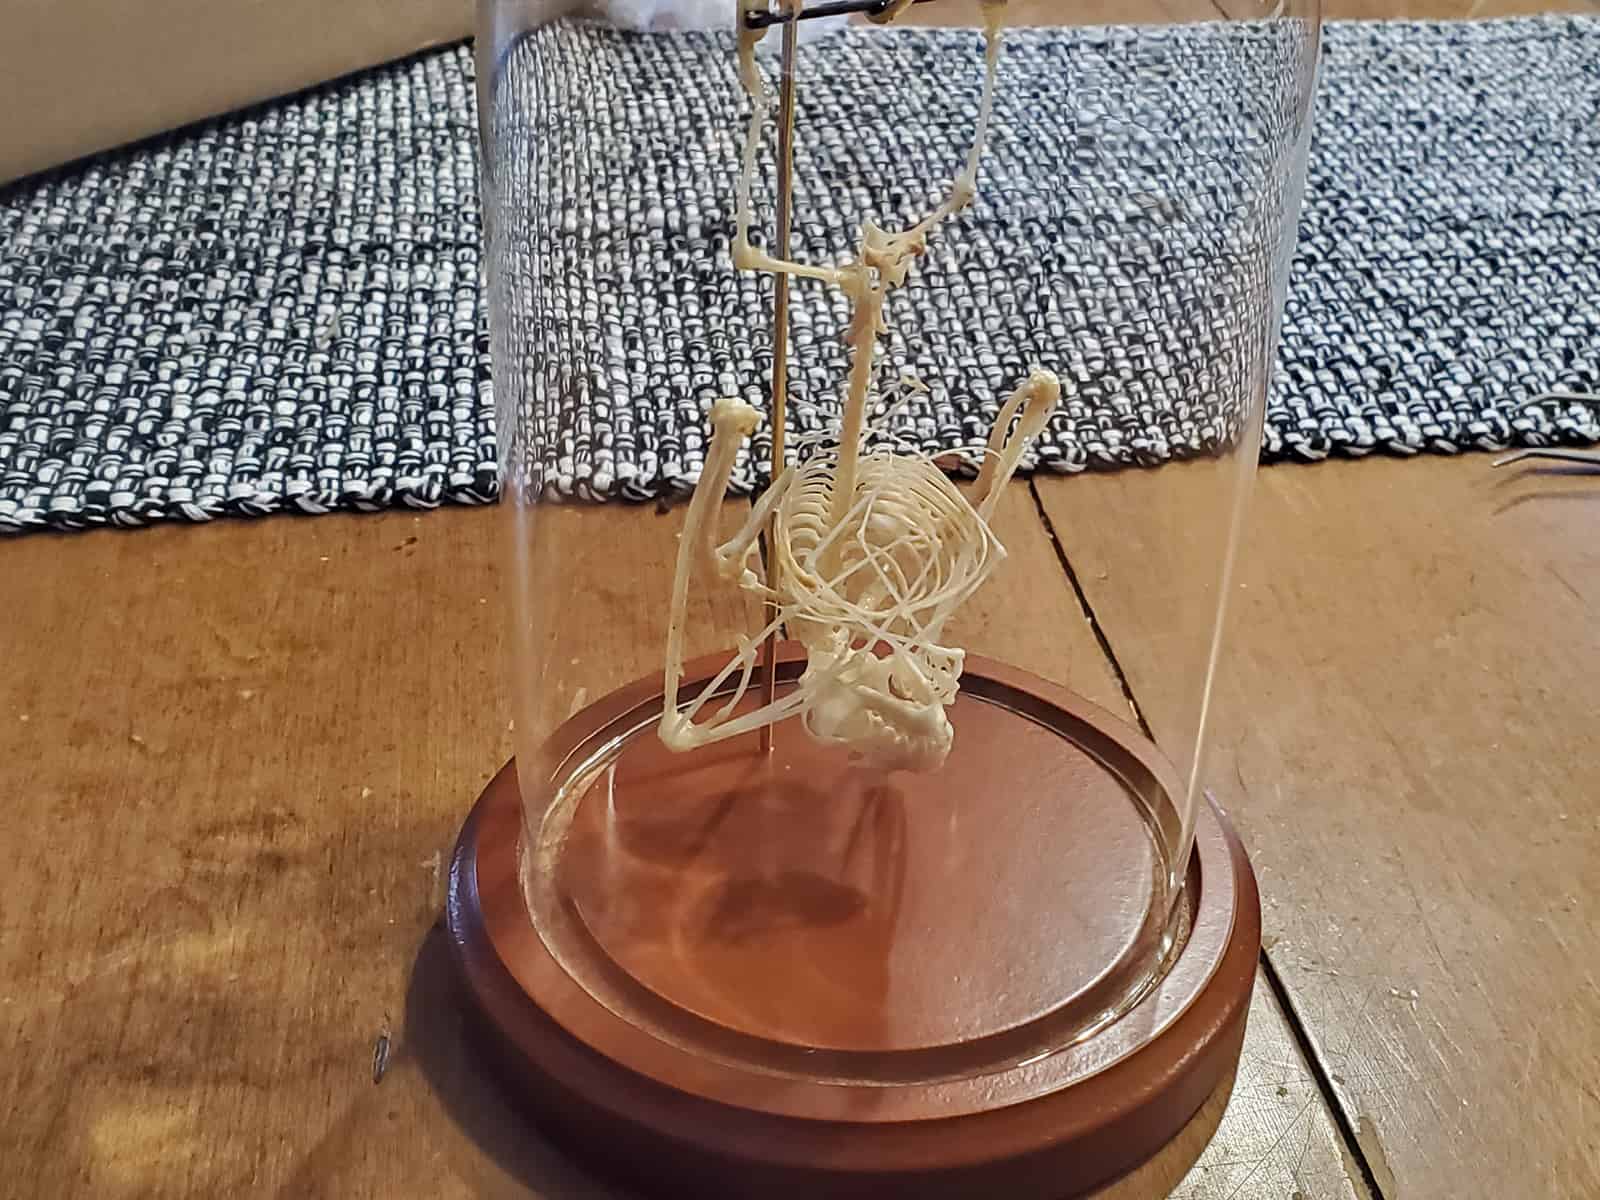
I picked up a neat little taxidermy bat skeleton from Etsy seller Artem Mortis a few days ago with the intention of giving it as a gift. It took a while to arrive, and needed a little repairing when it finally showed up on my doorstep, but I have to say it’s surprisingly cool.
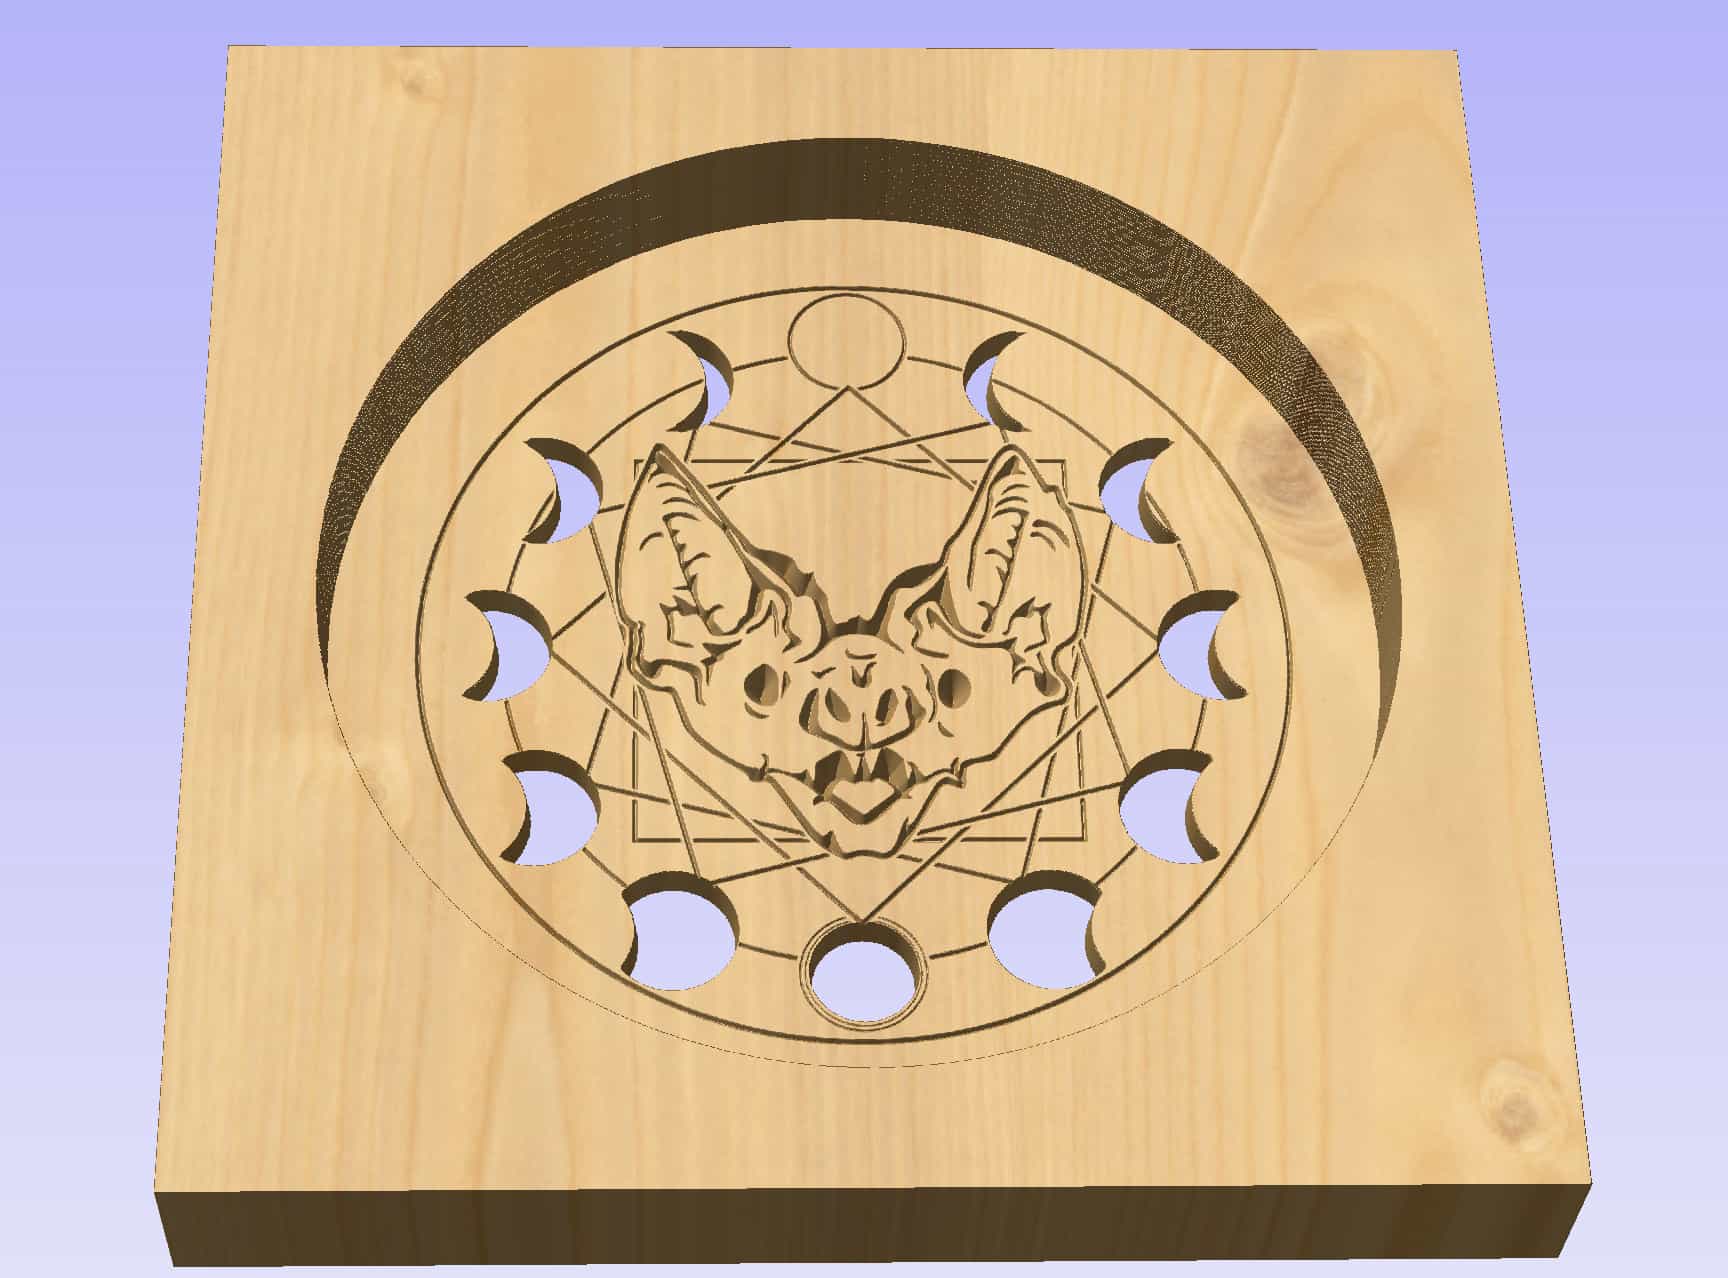
While the bat itself is great, the base felt a little… underwhelming? I figured it wouldn’t be too hard to save the glass and stand but replace the plinth itself with something a bit showier. I decided that I wanted to make something that incorporated LED lighting because it seemed like it’d add to the moody nature of the piece. I dug out a 3/4″ thick piece of poplar from my wood scrap pile and started noodling around with some design ideas in Illustrator that I thought might be fun to engrave on a base.
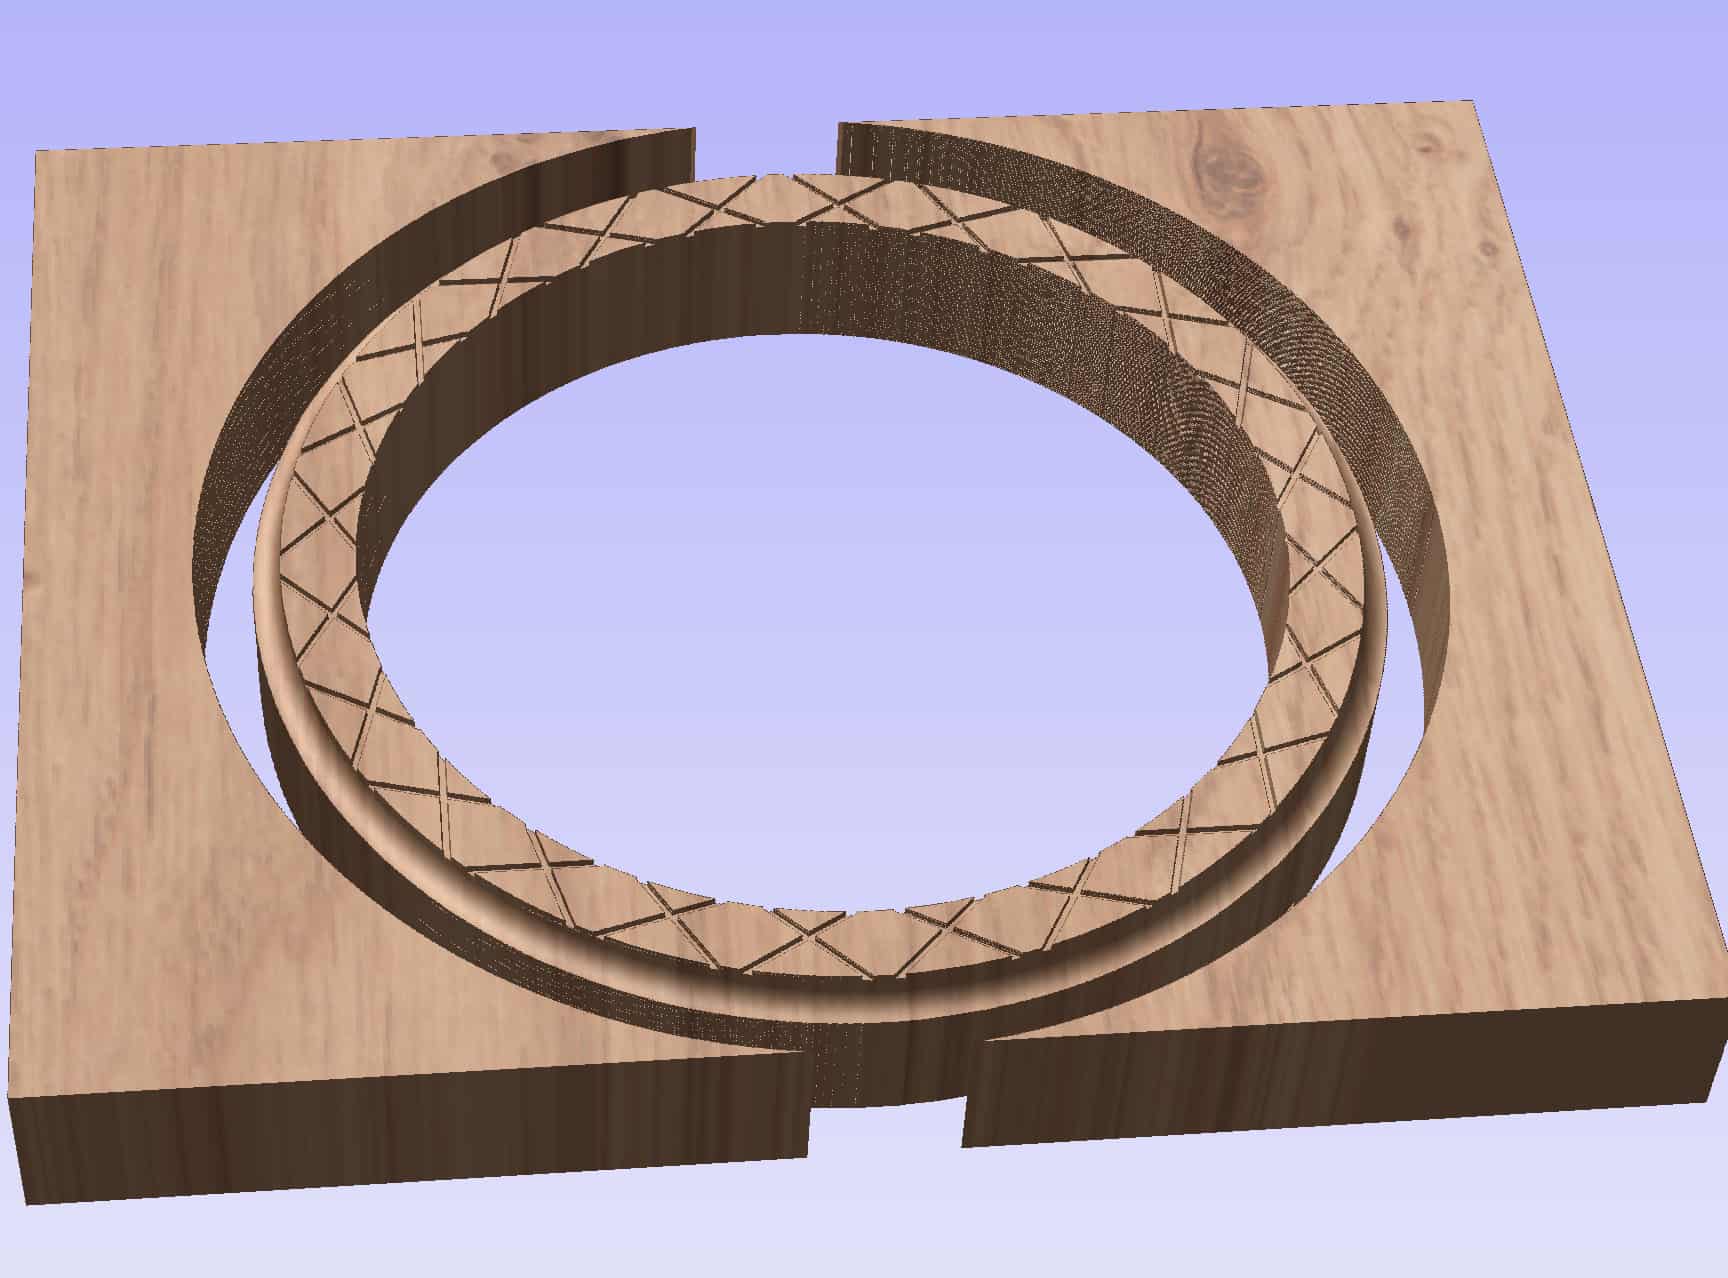
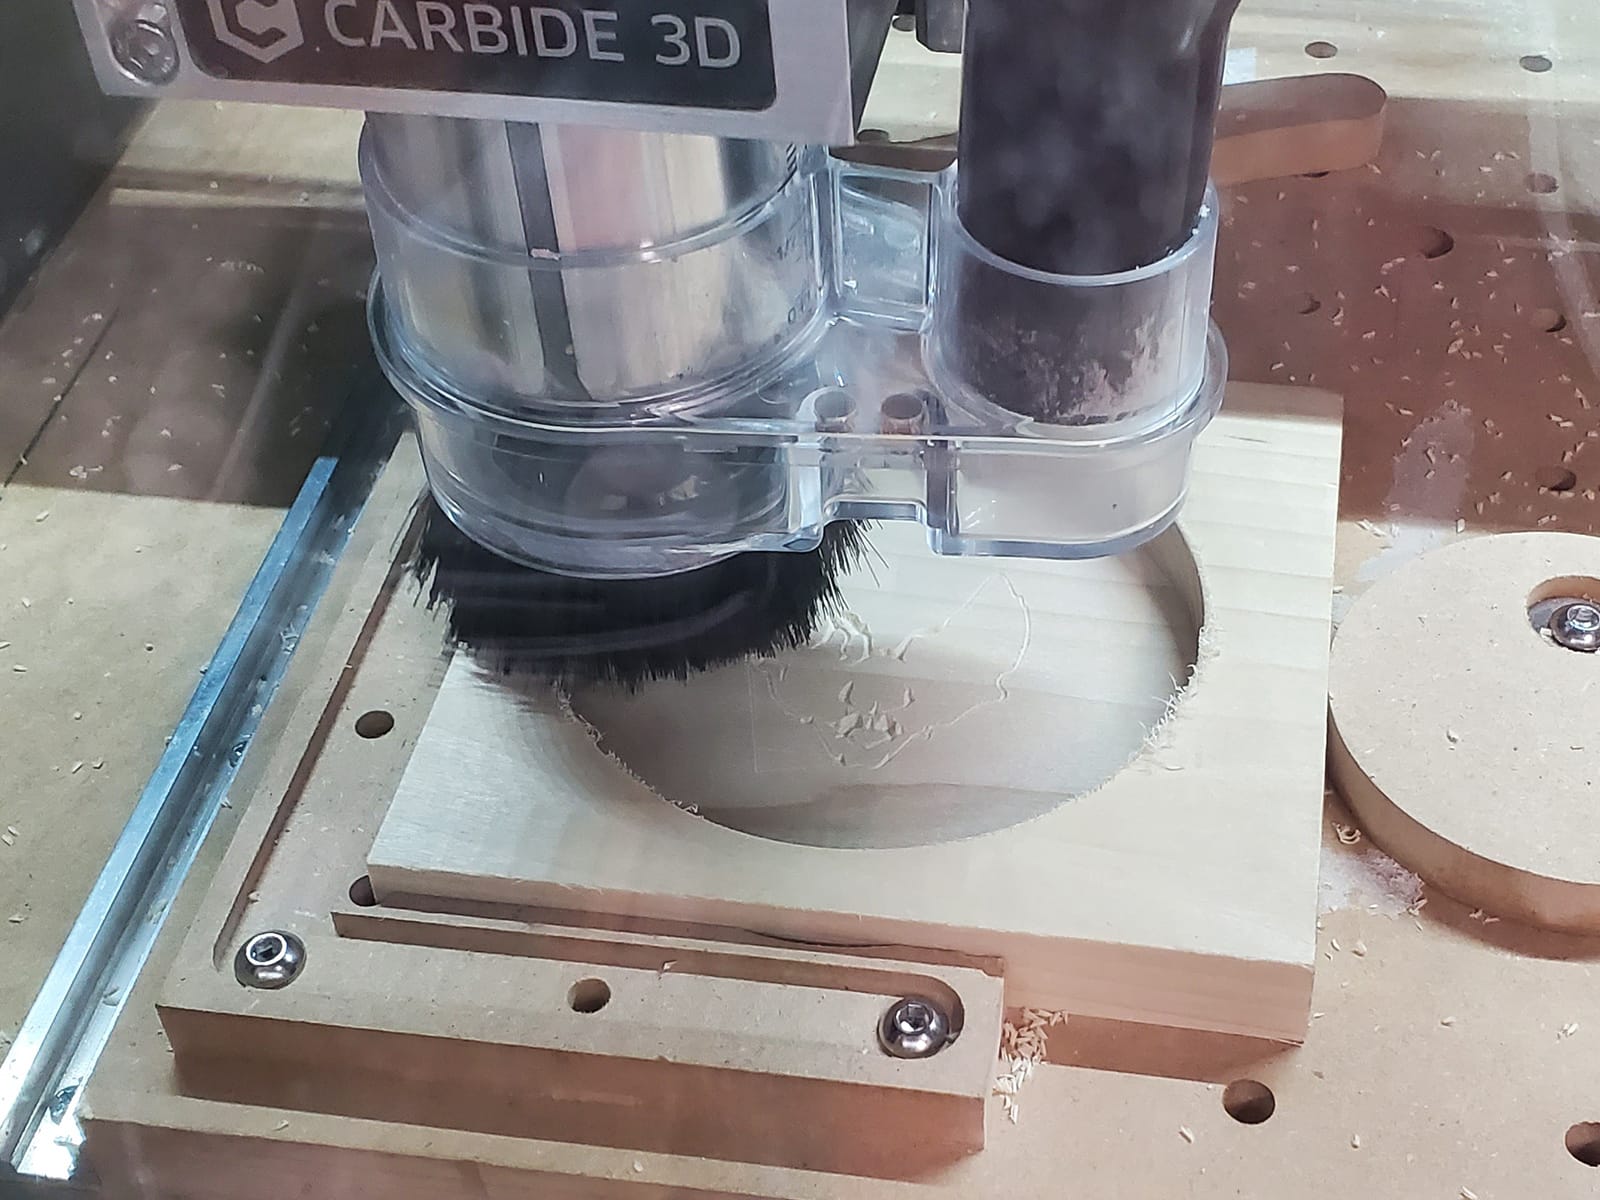
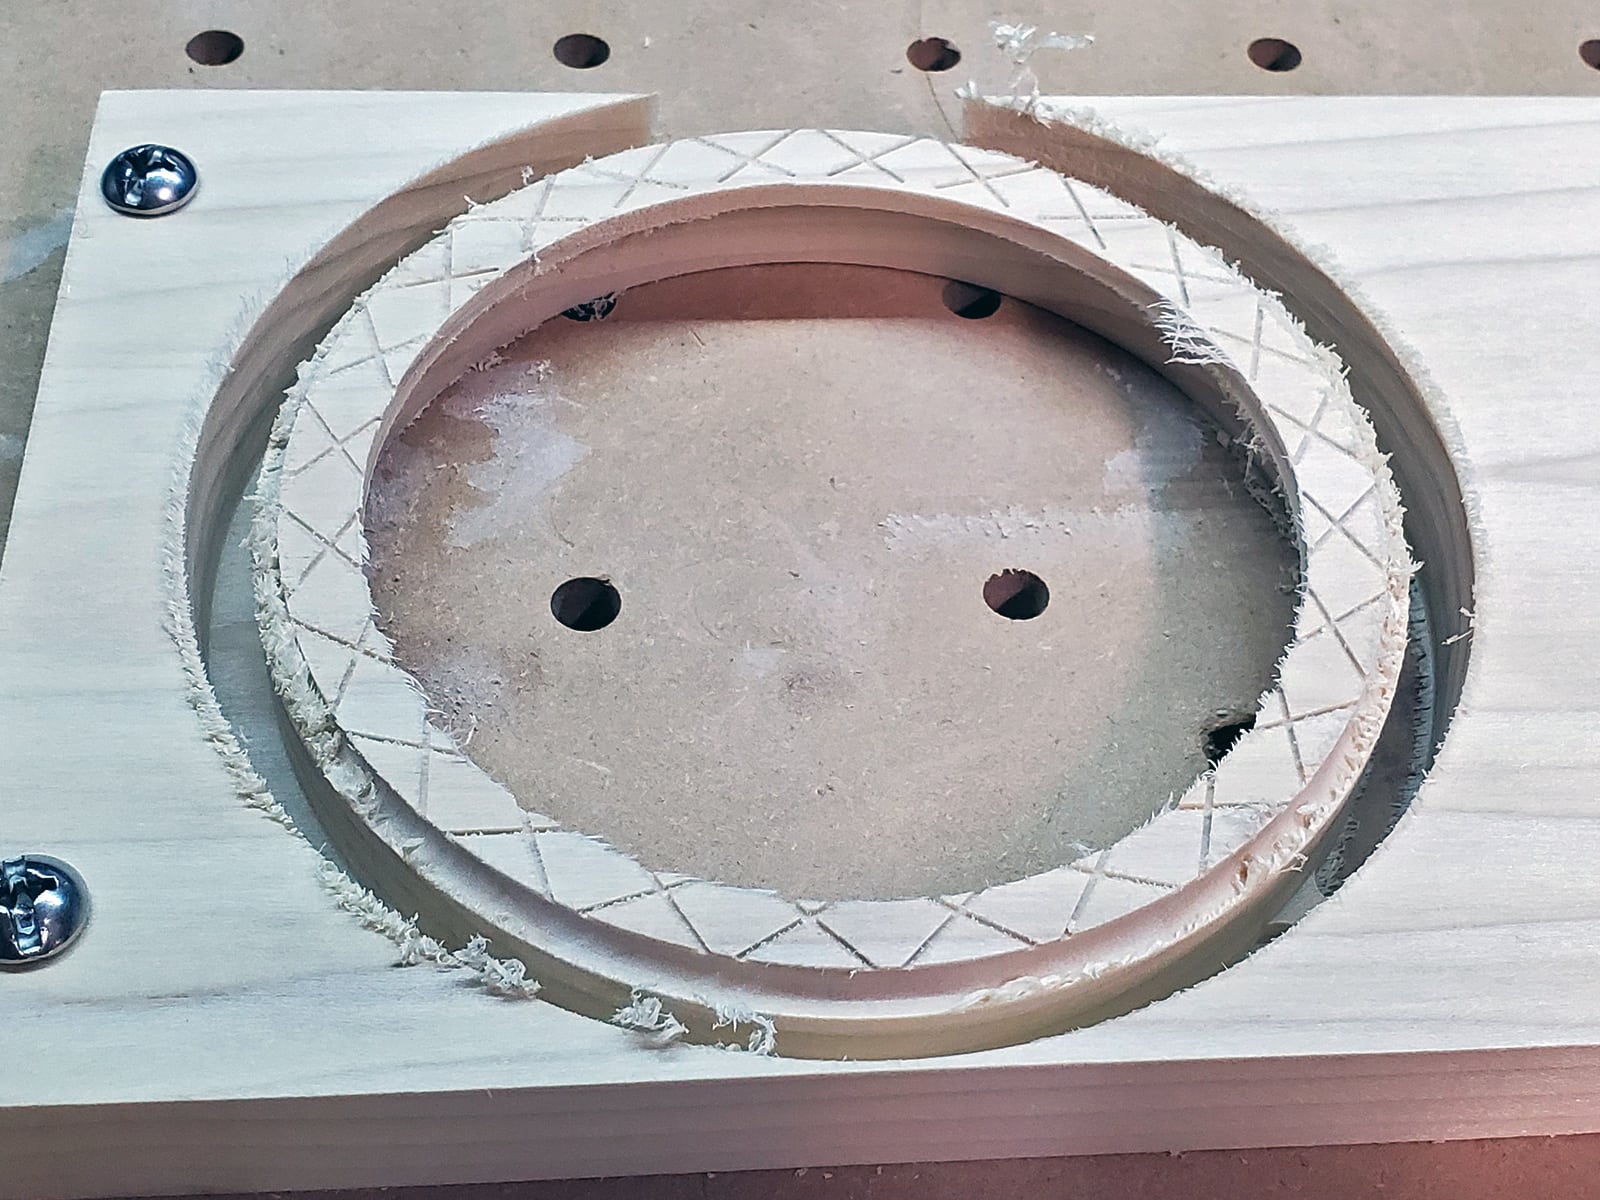
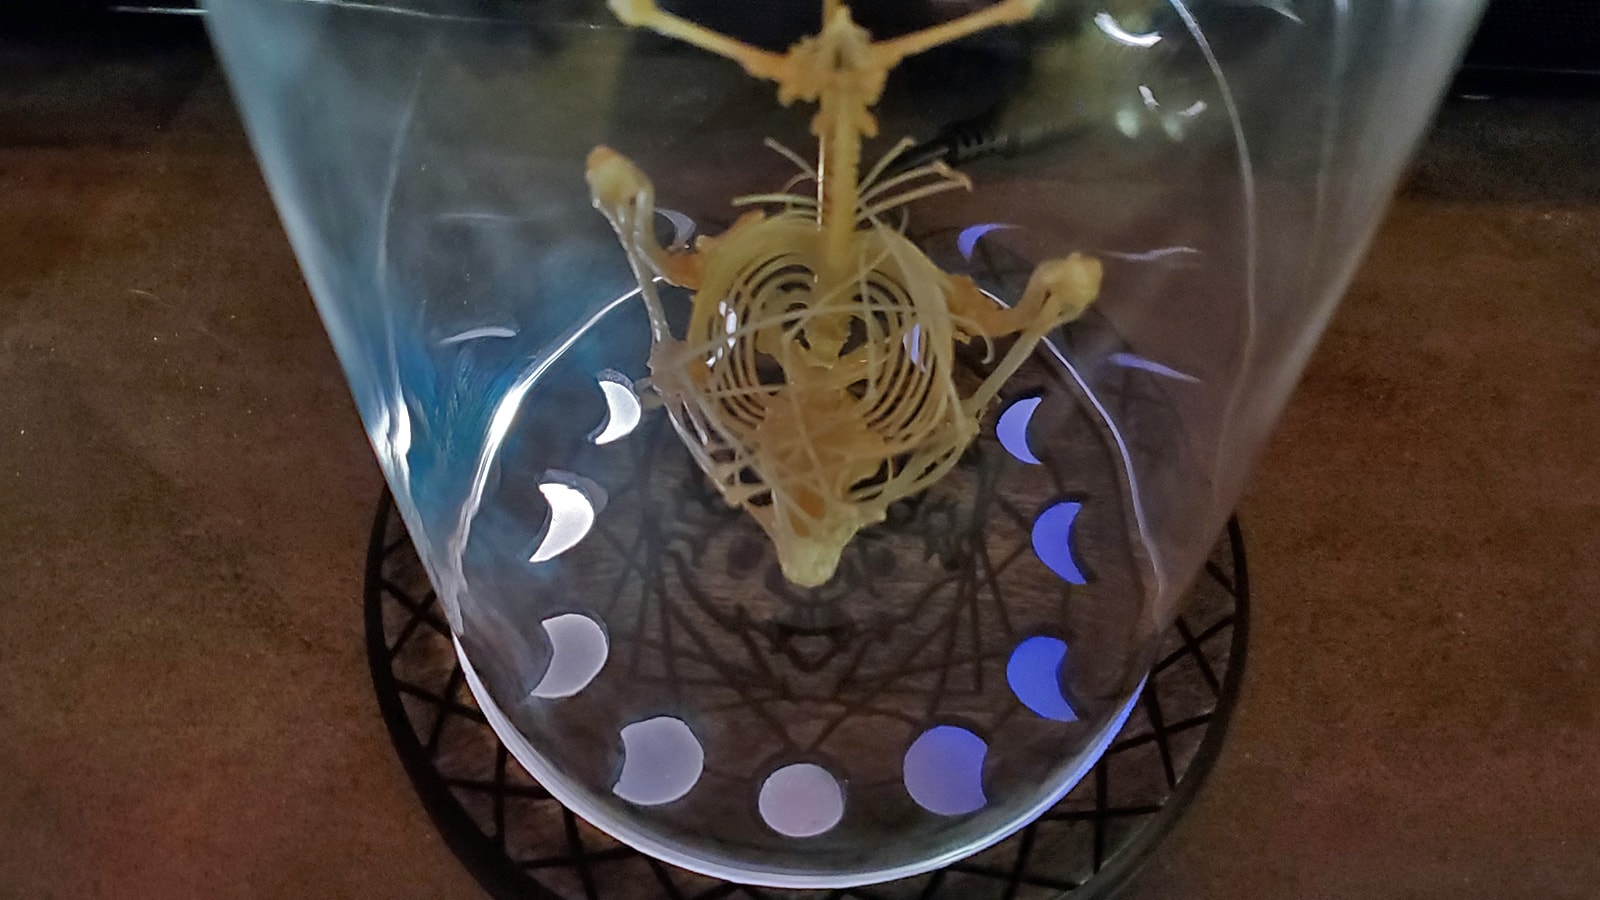
I settled on a three-part design: A disc beneath the bat itself, a larger disc made of clear acrylic to support the dome and diffuse the lighting, and an outer surrounding ring to slot it all together. The outer ring needed to be a two-operation job so that I could carve out a recessed section on the back that would accommodate the LED strip lighting I was going to use and the acrylic disc. The moons on the upper engraved disc would be cut out to let the illumination through, which would hopefully shine on the bat skeleton (and, well, look cool). It was a pretty quick job to machine these all up on my Shapeoko CNC.
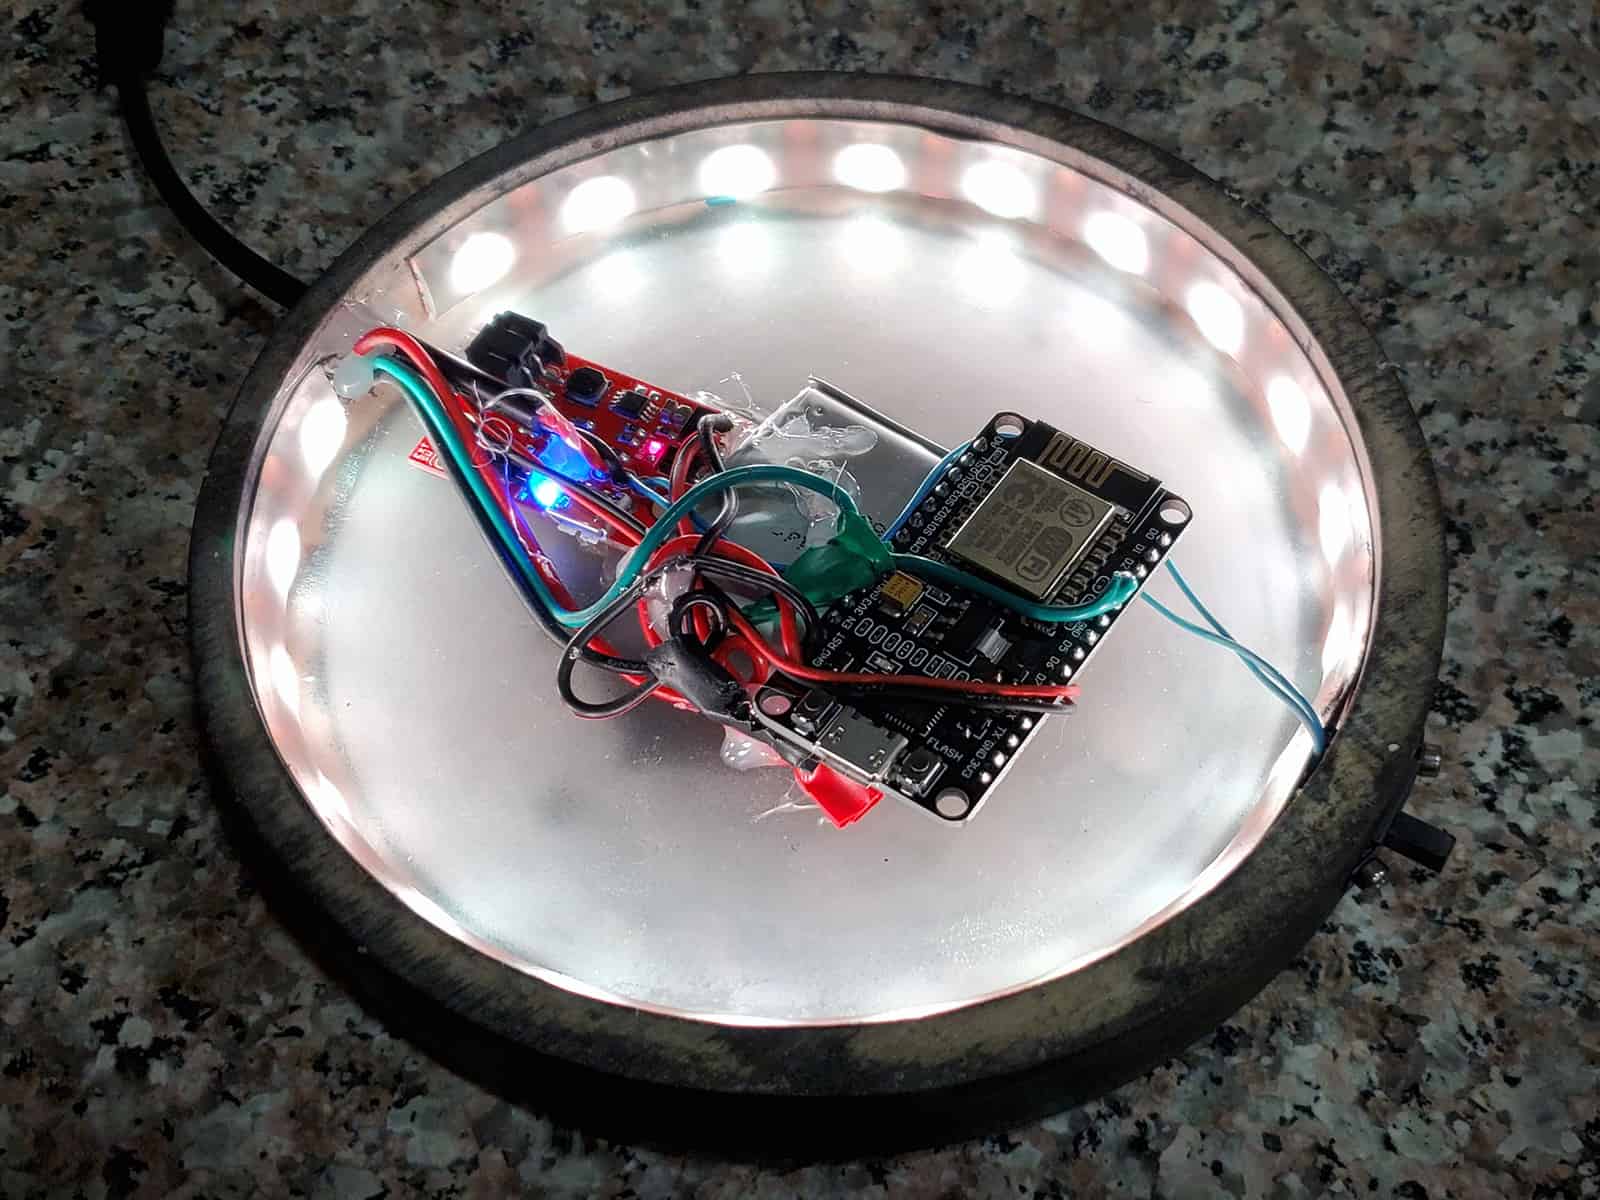
As far as the electronics went, I started with an ESP8266 NodeMCU Module to control the show. I’m actually really impressed with this thing – I’d normally use something like a Trinket or similar, but these end up not only being cheaper but easier to work with and have far more features. Unlike the Trinket, these have very accessible serial communication built in, which makes debugging any code I’m working on a lot easier. Moreover, the ESP8266 has a built-in WiFi chip on the board! That opens up a lot of extra design possibilities.
I wanted the base to be able to run without wires, but also didn’t want to have to deal with constantly changing batteries, so I went with a LiPo battery. I also grabbed a LiPo charger/booster from SparkFun. This gave me a straightforward way to recharge the battery, and also stepped the voltage output from 3.7V up to 5V, which is what the WS2812/Neopixel-style lighting strips are expecting.
While tinkering, I was happy to discover that the ESP8266 boards were able to drive the data line for the LED strips without any kind of logic level shifting. I was worried that because the 8266 outputs 3.7V logic I might have to throw in a converter, but it worked without a hitch.
For power input, I used a female 2.1mm barrel jack connector that trailed out through the back of the base. This got plugged into a matching male 2.1mm barrel connector with a USB 2.0 plug on the other end. I figured USB power offered a wider range of options for what you could plug the base into, and I feel like everybody’s got a pile of USB power blocks these days anyway.
My assembly of the components was a little messy, but the important thing was that it all worked. If I had to make more of these, I’d definitely want to take the time to organize things better, but as a one-off it’s fine.
The slide switch built into the base disconnects the ESP8266 from the battery, which allows for the whole thing to charge while plugged in without being lit up. I hadn’t actually wanted to use waterproofed LED strip lights, but they’re what I had handy in my workshop, and I feel like it worked out for the best anyway. In order to diffuse the light through the acrylic, I sprayed it down with some Rust-Oleum Frosted Glass paint, and it ended up diffusing the waterproofing cover of the strip lighting, too. Happy little accidents, I guess.
Blynk and You'll Miss It
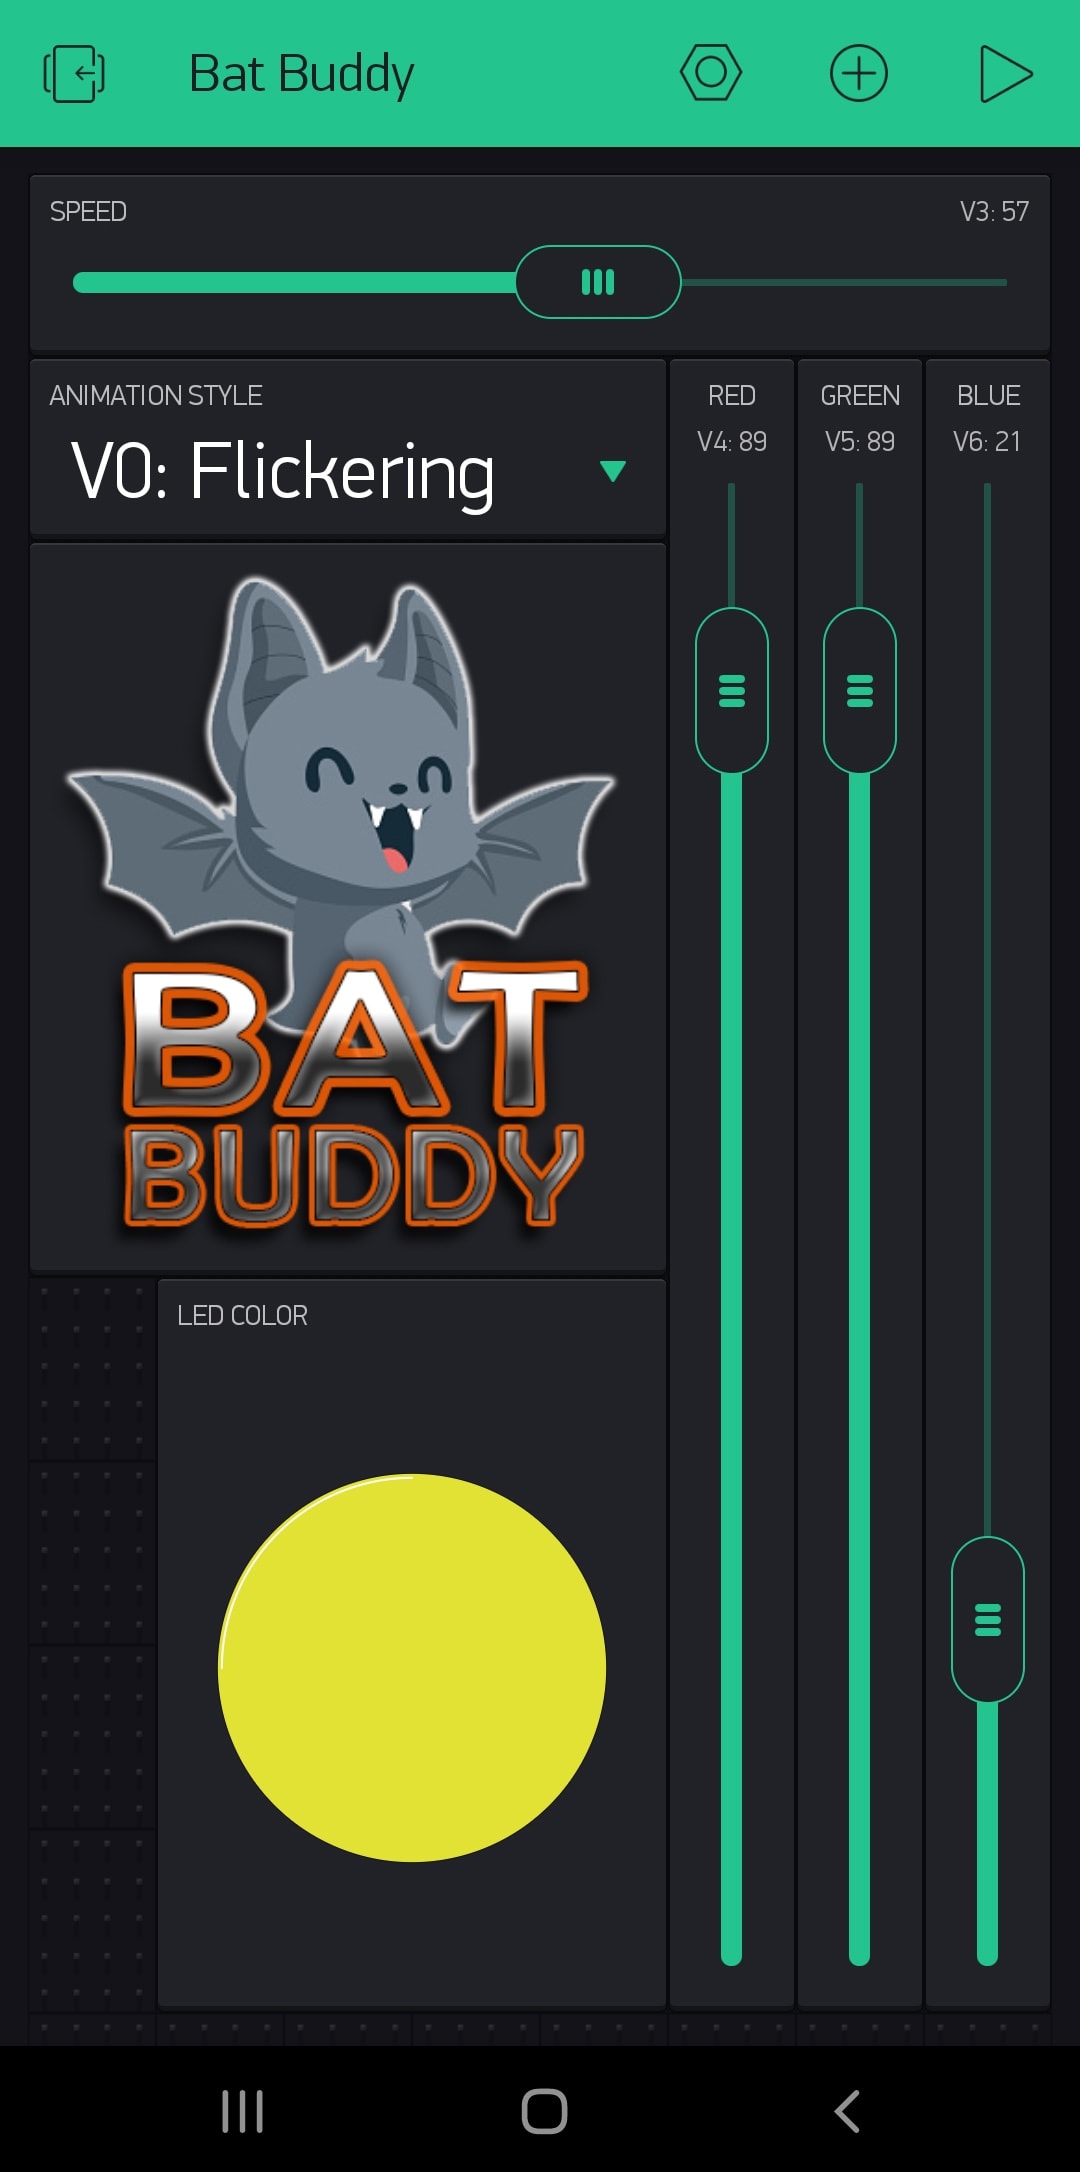
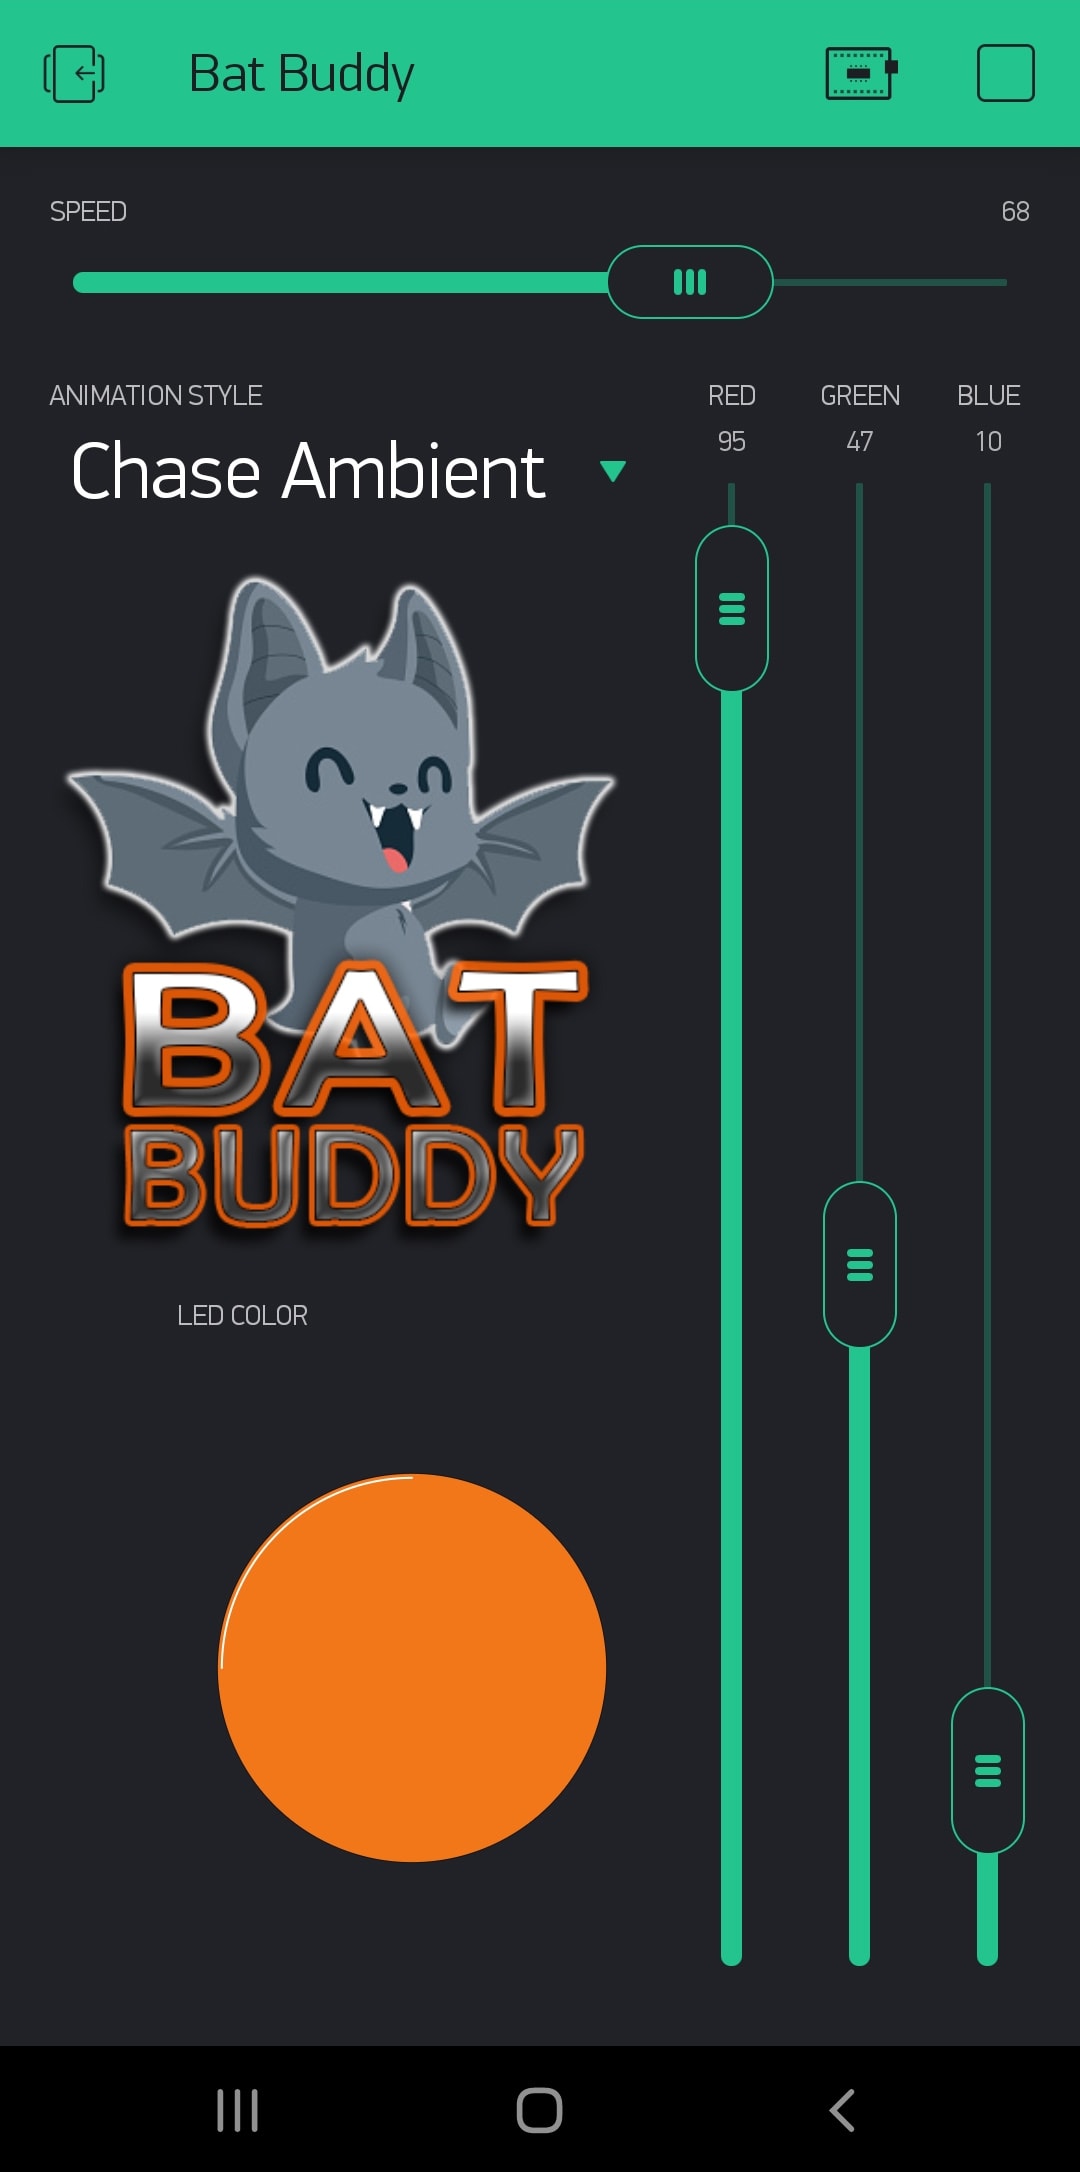
I wanted to take advantage of the ESP8266’s WiFi functionality, so I started looking into how hard it’d be to control from something like a web app or a phone. I stumbled onto a tool called Blynk which ended up being surprisingly robust. Basically, it let me create some controls that the 8266 could communicate with. This meant I could do things like change the color/RGB value of the strips, cycle through different animation styles, and adjust the speed of said animations. As long as the ESP8266 can connect to a WiFi network and get internet access, any device (Android or iPhone) with the correct authentication key can adjust these variables in real-time with simple buttons and sliders.
Since I am a complete dork, I also added a logo for what I dubbed the “Bat Buddy” to the app.
One thing I really wanted the base to be able to do was display the current lunar phase. Thankfully, Blynk made this relatively straightforward. They have a Real-Time Clock (RTC) widget that can feed the current date directly to the ESP8266. Thanks to the internet, I was able to get some other essential information for calculating this all out – given that a year is 365.25 days, the lunar cycle is 29.54059 days, and a reference date for when a new moon happened (Jan 6, 2000 was an easy one), it’s possible to calculate with reasonable precision what the moon’s up to.
void moonPhase(int nYear, int nMonth, int nDay) // calculate the current phase of the moon
{
  float age, phase, frac, days_since;
  long YY, MM, K1, K2, K3, JD;
  YY = nYear - floor((12 - nMonth) / 10);
  MM = nMonth + 9;
  if (MM >= 12){
    MM = MM - 12;
  }
  K1 = floor(365.25 * (YY + 4712));
  K2 = floor(30.6 * MM + 0.5);
  K3 = floor(floor((YY / 100) + 49) * 0.75) - 38;
  JD = K1 + K2 + nDay + 59;  //Julian day
  if (JD > 2299160){ //1582, Gregorian calendar
    JD = JD - K3;
  }

  days_since = JD - 2451550L; //since noon on Jan. 6, 2000 (new moon @18:00)
  phase = (days_since - 0.25) / 29.53059; //0.25 = correct for 6 pm that day
  phase -= floor(phase);  //phase in cycle
  age = phase * 29.53059;

  // calculate fraction full
  frac = (1.0 - cos(phase * 2 * PI)) * 0.5;

  illuminationPercent = frac*100;
  if(phase <= .5){ //Waxing (LEDS 0 through 10)
    ledMoon = map(illuminationPercent, 0, 100, numberOfNeopixels, 10);
    //ledMoon here is a global int tracking which LED on the strip should be lit.
    updateMoon();
  } else { //Waning (LEDS 10 through numberOfNeopixels (21))
    ledMoon = map(illuminationPercent, 0, 100, 0, 10);
    updateMoon();
  }
}

void updateMoon(){
// If it's within 5% of no moon, we'll switch the LEDs off.
  strip.fill(strip.Color(0,0,0), 0, numberOfNeopixels);
  if(illuminationPercent > 5){
    strip.setPixelColor(ledMoon, red, green, blue);
  } else {
    ledMoon = 99;
  }
  strip.show();
}
Admittedly it’s not perfect because the LED strip light bleed illuminates more than one cut-out on the base, but I’m still pretty happy with what it does overall. It’s an effect that works better in-person than a cameraphone can capture.
Here’s a look at the finished product!


